-
Meet Omega
-
Charging
-
Connectivity
-
Customizable Rear Paddles
-
Profile Customization
-
Customizable Side Buttons
-
Adjustable Instant Triggers
-
Customizable G-Keys
-
Accessory Customization
-
Interchangeable Thumbsticks
-
Tournament Cable Lock
-
Support and Limited Warranty
-
Paddle Removal
-
Resetting your controller
-
Battery Removal Information
MANUAL | QUICK START GUIDE
Omega
SCUF App
Pairing Omega with the SCUF App.
SCUF App for iOS
SCUF App for Android
CONNECTING TO THE SCUF APP:
To maximize Omega’s potential, please download the SCUF App from the iOS App Store or Google Play Store depending on your phone platform.
SCUF App:
Once downloaded, follow the steps within the app to pair it with your Omega. Once connected, you will be able to customize your settings, remapping, deadzones, sensitivity, calibration, polling rate (PC only) and much more.
Meet Omega
Built to perform and give you the advantage no matter what you play. Get more out of your game with more control and sharper reactions.
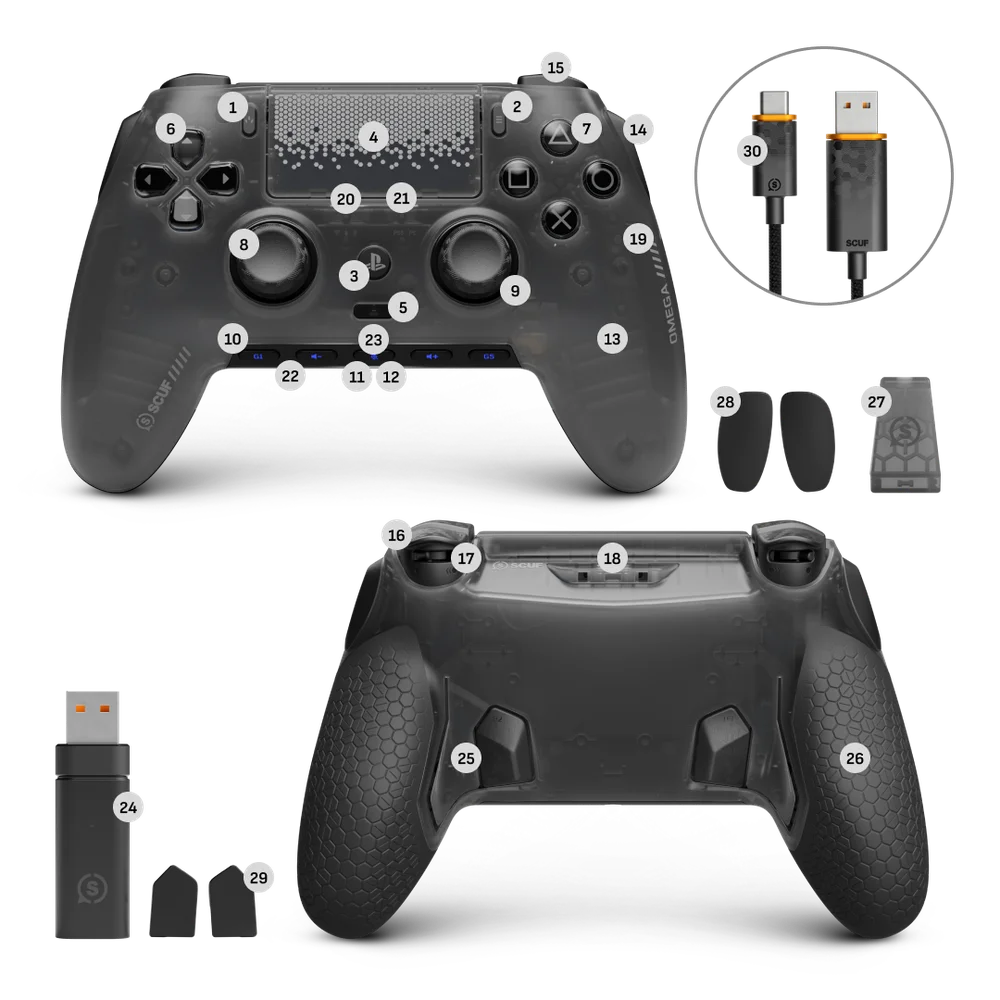
- Create Button
- Options Button
- PS Button
- Touch Pad/Touch Pad Button
- Profile Button
- Removable Mechanical D-Pad
- Removable Instant Action Buttons
- Interchangeable Thumbsticks
- Removable Anti-Friction Rings
- Customizable G-Keys
- Status Light
- 3.5mm Jack Port
- Removable Magnetic Faceplate
- Customizable Side Buttons
- Bumpers (L1 & R1)
- Adjustable Instant Triggers (L2 & R2)
- Instant Trigger Switch
- USB-C Port
- Reset Button
- Connectivity Switch
- Platform Switch
- Battery Indicator
- Mute Indicator
- USB Dongle
- Customizable Rear Paddles
- Performance Grip
- Tournament Cable Lock
- Side Button Blanking Plates
- Inner Paddle Blanking Plates
- USB-C Cable
Charging
To charge your controller, use the included USB-C Cable and connect it to your PlayStation®5 console or PC while it is on or in rest mode. When charging is complete, the light bar will stop pulsing green.
The Status Light will show the battery status based on the grid below:
Power Status
You can check your controller's battery status at start-up, when plugging or un-plugging the USB-C cable, and when changing between wired and wireless modes.
| BATTERY STATUS | POWER LED INDICATION |
| Low | Breathing Red |
| Medium | Breathing Orange |
| High | Breathing Green |
| Charged | Static Green |
Please note that battery status will be event indicators.
You can check the battery level by pressing the PS Button when the gamepad is OFF and the USB cable is connected.
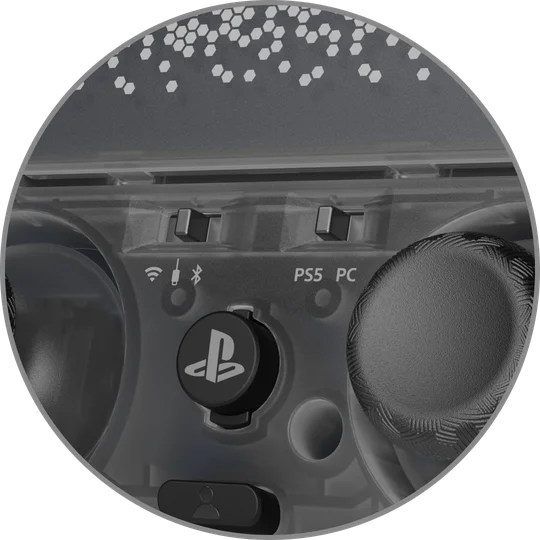
Connectivity
Omega has a Connectivity Switch and Platform Switch that can be found underneath the Removable Magnetic Faceplate. To toggle these switches to your desired platform, simply remove the faceplate and follow the instructions below:
Connectivity Switch – Wired, Wireless, and BT
Platform Switch – PlayStation and PC
For Wired Play with Omega:
- Please remove the faceplate.
- Toggle the Connectivity Switch to wired mode.
- Toggle the Platform Switch to either PlayStation or PC depending on which platform you want to connect to.
- Finally, connect the included USB-C cable to your controller and the desired platform (PlayStation or PC).
For Wireless Play with Omega:
- Please remove the faceplate.
- Toggle the connectivity switch to wireless mode.
- Toggle the platform switch to either PlayStation or PC depending on which platform you want to connect to.
- Plug in the included USB Dongle to your desired platform (PlayStation or PC).
- Finally, press and hold the PS Button to power on your Omega.
For Bluetooth Play with Omega (available only on Mobile):
- Please remove the faceplate.
- Toggle the connectivity switch to BT mode and hold the PS Button to turn on the controller.
- Once in BT mode, confirm your Omega is in pairing mode by checking that the status light is blinking blue.
- If pairing does not start automatically, press and hold the PlayStation and Create buttons simultaneously to enter pairing mode.
- Once it is in pairing mode, make sure the device you want to pair it to is in BT discover mode.
- Find and select Omega and your controller will now be ready for gaming.
Please note:
- This controller uses 2.4GHz radio-frequency bandwidth. When PlayStation®5 and other products uses 2.4GHz radio-frequency bandwidth also, there is a possibility that wireless interference occurs.
- Corsair validated this controller with PlayStation®5 (CFI-1000 series, CFI-2000 series and CFI-7000 series) including wireless testing and Corsair has product liability of this controller.
- As for PlayStation®5 1000 series, it is recommended to insert USB dongle of this controller to USB port on the front of PlayStation®5.
- For Bluetooth mobile play on iOS mobile devices, ensure your iOS mobile device is on iOS version 26.4 or higher.
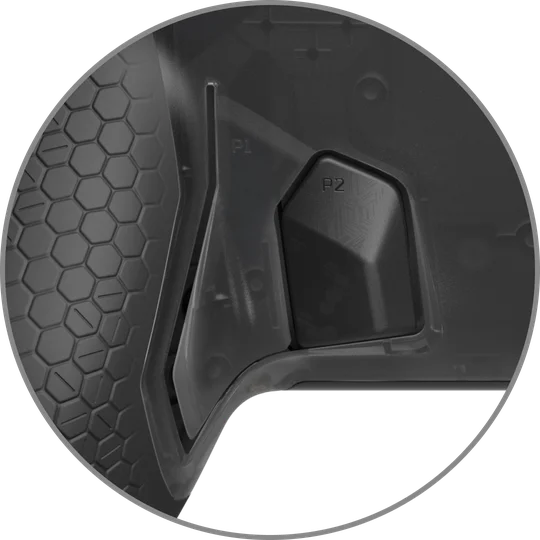
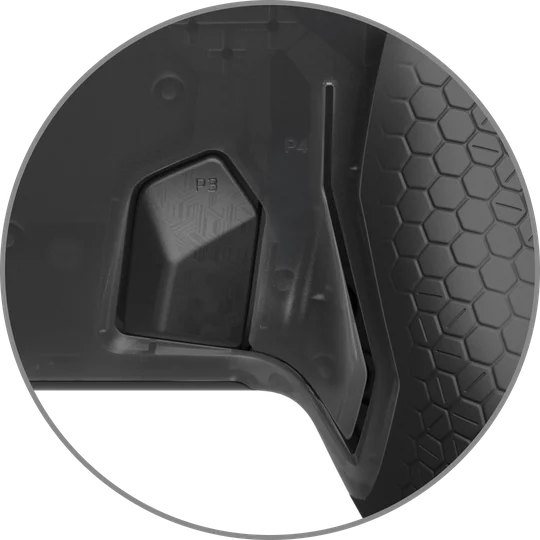
Customizable Rear Paddles
Customizable Rear Paddles allow you to keep your thumbs on the sticks and engage fingers that are usually passive. It may take some time to get used to, but it will shorten your response times and provide you with game-changing milliseconds. Omega’s inner paddles are removable if you only need two paddles.
Your controller comes with three pre-set paddle profile configurations to get you started. Simply press the Profile Button on the front of the controller to toggle and find the one you want.
Profile Customization
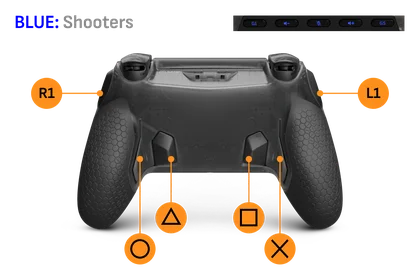
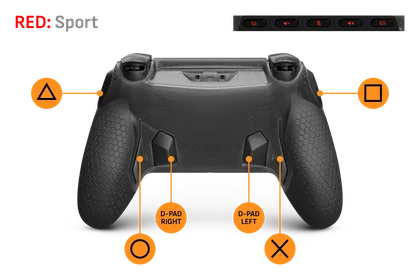

- First press the Profile Button until you see the color profile you want to change.
- Next, press and hold the Profile Button again until the light starts to blink.
- Now you can remap any paddle, Side Button, or G-Key by simultaneously pressing the paddle and the button you would like to remap it to. After a successful pair, the RGB Lighting Strip will turn white.
- Repeat the previous step for as many inputs as you want to remap.
- To save your remapped configuration, simply press the Profile Button one more time. The Profile Indicator light will stop blinking.
Please note:
- The inner paddles and Side Buttons can be removed easily and blanked with the included Blanking Plates.
- Paddles, Side Buttons, and *G-Keys can be mapped to your choice of L1/R1, L2/R2, L3/R3, the entire D-Pad or any of the four Action Buttons.
- Attention: You must have the triggers in Instant Trigger mode when assigning them to a Paddle, Side Button, or G-Key.
*In PlayStation mode, only G1 and G5 are customizable (G2, G3, and G4 are not). In PC mode you can remap all 5 G-Keys.
For all our game specific recommended layouts, please visit: scufgaming.com/gaming
Customizable Side Buttons
Omega features two Side Buttons, one on each side of the controller. Just in case you do not want to use the Side Buttons, we have made them removable and have included blanking plates to make sure your controller still looks and feels great. To remove the Side Buttons, simply remove the faceplate and replace the SAX buttons with the included blank out pieces, then replace the faceplate. We think you’ll love the extra buttons, though.
Please note:
- SAX buttons can be mapped to your choice of R1/L1, R2/L2, R3/L3, the entire D-Pad or any of the four Action Buttons.
- Attention: You must have the triggers in Instant Trigger mode when assigning them to a SAX button.
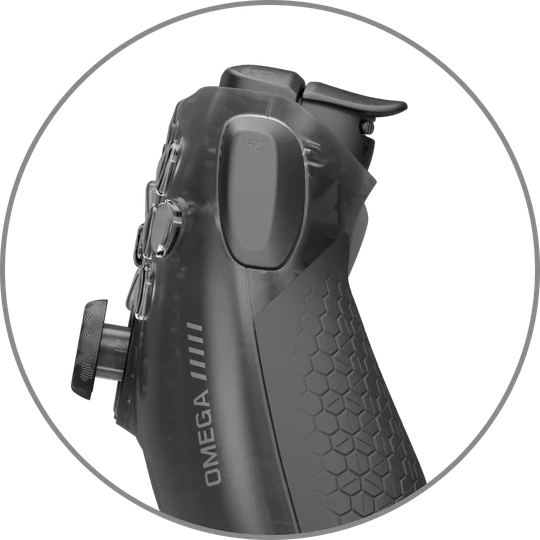
Adjustable Instant Triggers
Your Omega comes with a two-way trigger switch, giving you your choice of standard or Instant Triggers. Use Instant Triggers that activate like a mouse click for the fastest of shots. Prefer a longer pull for those days at the track? No problem, flip the switch the other way for the full range of motion in your triggers.
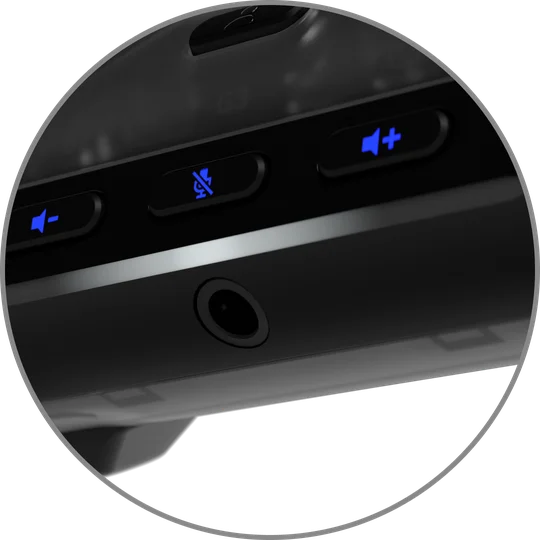
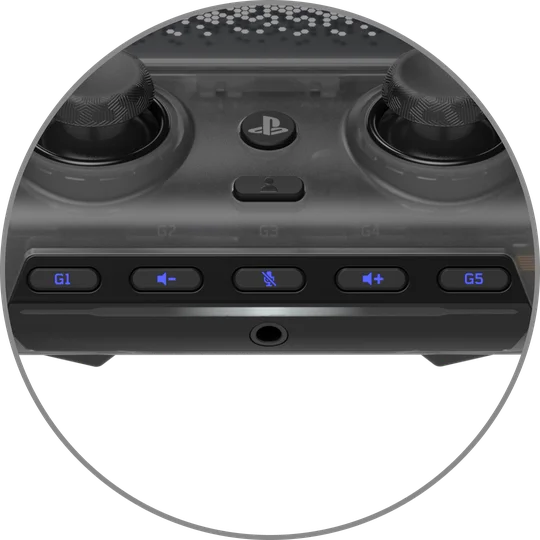
Customizable G-Keys
G-Keys provide you will 5 more customizable buttons. Below are the default G-Keys in PlayStation mode.
- G1: Empty/Programmable
- G2: Volume Down
- G3: Mic Mute
- G4: Volume Up
- G5: Empty/Programmable
Please note:
- G3 also controls the your Sidetone when a wired headset is connected to Omega in PlayStation mode.
- Please hold G3 for 2 seconds to toggle between: Sidetone off, Sidetone medium, and Sidetone high.
- The Sidetone will be off by default.
- Please note that in PlayStation mode, G2, G3, and G4 are fixed and not remappable. Only G1 and G5 are remappable in PlayStation mode. In PC mode you can remap all 5 G-Keys.
- Please use the SCUF mobile app to fully unlock the G-Key customization experience.
- G1 & G5 can be mapped to your choice of R1/L1, R2/L2, R3/L3, the entire D-Pad or any of the four Action Buttons.
- Attention: you must have the triggers in Instant Trigger mode when assigning them to G1 and G5.
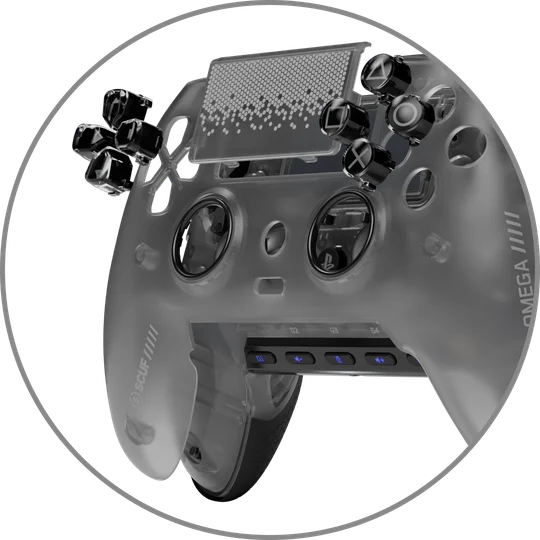
Accessory Customization
Want to swap your thumbsticks? Change your D-Pad? Change up your faceplate and touch pad? Simply remove your faceplate by gently pulling it from the top, near the USB-C port and pull away. Now you have access to remove your Touch Pad, Thumbsticks, Anti-Friction Rings, SAX Buttons, Action Buttons, and D-Pad. Make your changes. Reverse the motion to replace. Game on.
Keep your look fresh with a new Faceplates, Touch Pads, Thumbsticks, Anti-Friction Rings, SAX Buttons, Action Buttons and D-Pads — there are endless combinations available at scufgaming.com.
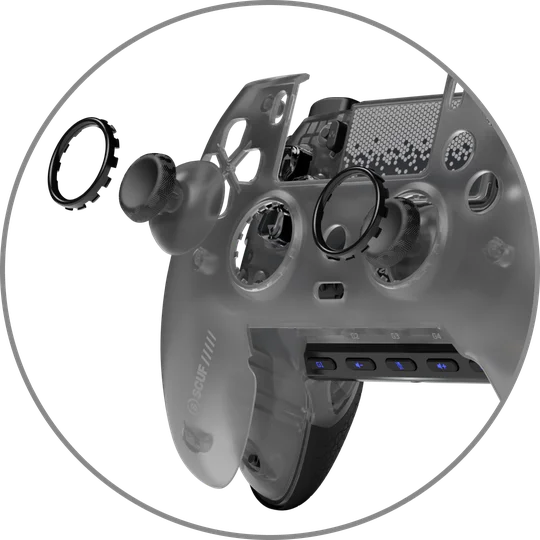
Interchangeable Thumbsticks
First things first, what are you playing?
For first person shooters, we recommend using your tall thumbstick on the right for precision and accuracy through the scope. Short concaved on the left to dig in for quick, responsive moves. For sports games, stick with your concave sticks, they’ll give you the right balance.
Want to do your own thing? We get it. Remove your faceplate and touch pad cover by simply starting from the top of the faceplate and pulling the magnetic faceplate off. For the touch pad cover, simply start at the top and pull. It will then easily pop off from the controller. Slide the new one on just as easily. To remove your Anti-Friction Rings, simply push them out from behind the faceplate trim and reverse the motion to reinstall.
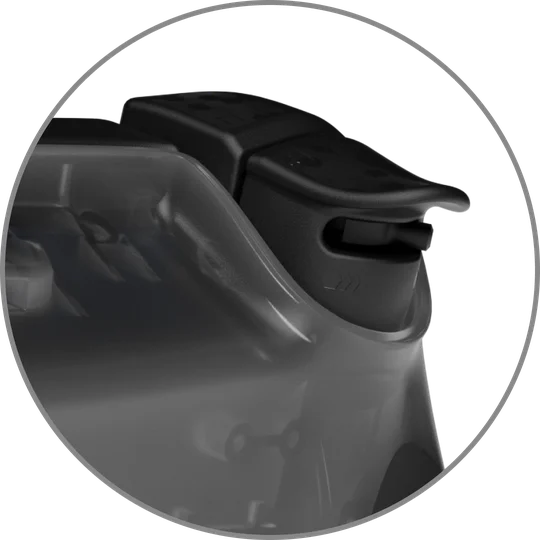
Tournament Cable Lock
Your OMEGA comes with a USB cable lock. This prevents the cable from disconnecting from the controller. Please insert the cable into the controller. Please connect the tournament lock to the cable first. While positioned, please connect the tournament lock into the locater holes found on the underside of the USB port.

Support and Limited Warranty
This product is covered by a 1 year Limited Warranty.
The date your warranty commences depends on your location and place of purchase. For SCUF Gaming Limited Warranty information, please visit scufgaming.com/limited-warranty.
For technical assistance, questions about your product or warranty, please visit scufgaming.com/support.
Contact: scufgaming.com/contact.
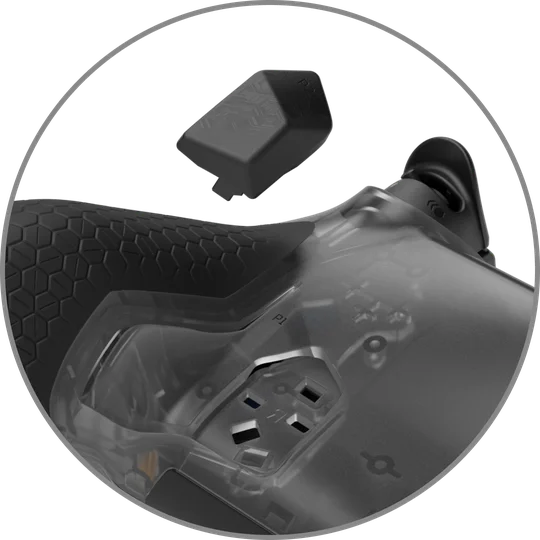
Paddle Removal
Simply use the fingernail groove on the inner paddle to pull out of the paddles. You can then use the inner paddle blanking plates to keep the back flush.
Resetting your controller
If you ever feel the need to reset your controller, see the instructions below to do so.
You can reset your controller by three methods:
Using the reset button: Press the reset button using a long thin object such as a paper clip. To find the reset button, please take off the faceplate and find the small hole below the Circle Button. Please note that the reset button will recover the controller in the event the controller becomes stuck. The reset button will not reset profiles.
Performing a Soft Reset: to restore the controller back to factory settings...
- Turn off the controller
- Press and hold 'X' + 'PS Button' for 5 seconds
- While the buttons are held, the controller will start back up
Please note that performing a soft reset will return the controller's
profiles, mappings, lighting effects, trigger settings, thumbsticks settings, brightness, automatic sleep enabled/timeout, polling rate, and calibration data back to factory default settings.
Performing a Hard Reset: to restore the controller back to the out-of-the-box settings...
- Turn off the controller
- Press and hold ‘Circle’ + 'Triangle’ + ‘PS Button' for 5 seconds
- While the buttons are held, the controller will start back up
Please note that performing a hard reset will return the controller's
profiles, mappings, lighting effects, trigger settings, thumbsticks settings, brightness, automatic sleep enabled/timeout, polling rate, and controller pairing data back to factory default settings.
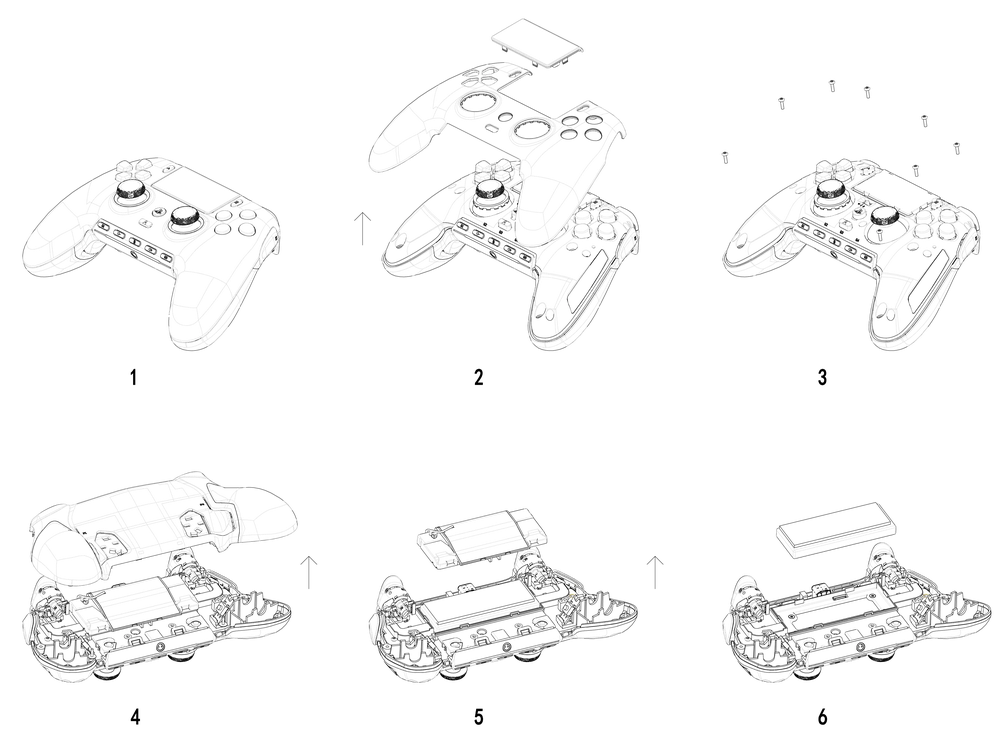
Battery Removal Information
This product uses a rechargeable battery and safety guidelines must be followed in the event that the product is disabled for disposal and recycling. To safely remove the battery for disposal and recycling, follow the numbered steps with the below diagrams.
SCUF Gaming encourages customers to recycle used electronic hardware and rechargeable batteries in accordance with local laws and regulations.
SCUF Omega
M/N (型號): RGC0005
Rating (電壓電流): XV ⎓ XXXmA
Dongle
M/N (型號): RGC0006
Rating (電壓電流): XV ⎓ XXXmA
FCC ID: 2AAFM-RGC0005 (Gaming controller)
FCC ID: 2AAFM-RGC0006 (Dongle)
IC: 10954A-RGC0005 (Gaming controller)
IC: 10954A-RGC0006 (Dongle)
“PlayStation Family Mark”, “PlayStation”, “PS5”, and “PlayStation Shapes” are registered trademarks or trademarks of Sony Interactive Entertainment, Inc. All rights reserved. All other trademarks are the property of their respective owners. Manufactured and distributed under license by Sony Interactive Entertainment and its affiliates.
